The duel of HMAS Sydney and Kormoran
|
|

|
|
HMAS Sydney, the largest Allied warship to go down with all hands during World War II (Photo: Royal Australian Navy)
|
|
|
Nazi Germany knew that it could not compete with the Allies in open naval engagements, and accordingly placed great emphasis on commerce raiding, i.e. conducting hit-and-run attacks against Allied transport ships. The two main tools for this type of warfare were submarines and merchant raiders (also called "auxiliary cruisers"). The latter were civilian ships pressed into military service, unarmored and carrying whatever light weaponry could be scrounged up. They were quite capable of capturing or sinking unprotected merchant ships, but were no match for a real military vessel, and relied on false identities to avoid combat with warships. In fact, the Kormoran was the only merchant raider in modern naval history to sink a dedicated warship.
|
|

|
|
Captain Theodor Detmers, commanding officer of the Kormoran (Photo: Wikipedia)
|
|
|
The Kormoran, captained by Fregattenkapitän Theodor Detmers, departed from German waters in December 1940, and spent the next year steaming down the Atlantic Ocean and across the Indian Ocean, sinking 10 Allied ships and capturing one. Her streak of success came to an end 80 years ago today on November 19, 1941, near Dirk Hartog Island off the western coast of Australia. The ship was armed with six old 6-inch / 150 mm guns predating World War One, two anti-tank guns, five small-caliber flak guns and six torpedo tubes. She also carried two seaplanes, but technical problems constrained these to the cargo hold for most of the ship's cruise. She also carried a large number of sea mines which Captain Detmers intended to deploy along known Allied shipping routes.
|
|

|
|
The Kormoran, photographed from a German submarine (Photo: Bundesarchiv)
|
|
|
The Kormoran's adversary in her final adventure was the Australian light cruiser HMAS Sydney, commanded by Captain Joseph Burnett. Unlike the Kormoran, the Sydney was an actual warship. Her primary armament consisted of eight 6-inch / 150 mm guns in four turrets, comparable in caliber to the Kormoran's but of a much newer design with greater range, power and rate of fire. She also carried four 4-inch / 100 mm quick-firing guns, a large number of machine guns, eight torpedo tubes and a catapult-launched Supermarine Walrus seaplane.
|
|

|
|
The HMAS Sydney (Photo: State Library of Victoria)
|
|
|
The two ships spotted each other on the horizon at roughly the same time, around 3:55 p.m. At first, the Kormoran's crew thought they spotted the masts of a sailing ship, but soon realized their mistake. Detmer set a westward course at full speed, hoping to keep away from the Australian vessel long enough for the sun to get low on the horizon and obscure them from their pursuer with its glare. The Sydney gave chase and intercepted the German ship effortlessly. As she got closer, Burnett had his ship contact the suspicious vessel by transmitting a code in Morse via signal lamp.
|
|

|
|
The Sydney in the city of Sydney, which she was named after (Photo: Royal Australian Navy)
|
|
|
We should make a quick note here on how signaling worked (and still works) at sea. Radio or a signal lamp can be used to send combinations of Morse letters, with letters and sets of letters having a predetermined meaning. In this particular case, the Sydney's message was "NNJ", which stood for "You should make your signal letters." ("Signal letters" referring to each ship's unique identification code.) The Kormoran's crew, however, didn't understand this code. Sources vary on the reason: some claim they didn't know Morse code, others state that NNJ was a relatively little-used code and that's why the German sailors didn't understand it.
|
|

|
|
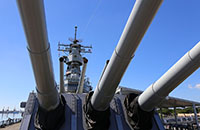
Signal flags hoisted on the USS New Jersey (Photo: ussnewjersey.com)
|
|
|
After half an hour of getting no reply, the Sydney switched to using flags, an alternative to Morse. Seagoing ships carry a set of signal flags of distinct patterns and shapes, each flag representing a specific letter or number, but each also potentially having other codified meanings. These flags can be hoisted up the mast to display them in a place where they are visible from a distance. In this case, the Sydney displayed "VH", the code for "You should hoist your signal letters."
This the Germans understood, but they naturally didn't want to identify themselves as a German merchant raider. At the time, the Kormoran was using the identity of the Straat Malakka, a real Dutch merchant vessel. Accordingly, they've raised the flags for "PKQI", the Straat Malakka's call-sign, and also hoisted the Dutch merchant ensign. However, the signal flags were raised in such a way that they were obscured by the ship's funnel. It's unclear whether this was an honest mistake, or a deliberate ruse to lure the cruiser closer. The Sydney sent another message requesting that the signal letters be made clear, which the German ship complied with. Meanwhile, the Sydney was steadily closing in.
|
|

|
|
The real Straat Malakka, the ship the Kormoran was impersonating (Photo: Australian War Memorial)
|
|
|
Between 4:35 and 5:00 p.m., the Sydney also asked the Kormoran's destination, port of origin and cargo, to which the latter replied with "Batavia" (in the Dutch East Indies), "Fremantle" (in Western Australia, coincidentally the Sydney's destination) and "Piece-goods." This must have further aroused Burnett's suspicion, as the Straat Malakka was not on the list of ships supposed to be in the area. Additionally, the Kormoran also sent another message in an attempt to further their deception. They've sent a radio message of "QQQQ" along with their coordinates and the time. At the time, this was the recognized code for "Being approached / under attack by a suspicious ship." This was, of course, a lie. Even if the Sydney had been attacking the Kormoran, the message should have been "RRRR", the code for being attacked by an enemy warship. By sending the wrong code, Detmers was trying to further the illusion that they're a legitimate ship while painting the Sydney as the commerce raider. We know from records that the message was received by a tugboat and a shore station – and, assumably, the Sydney herself.
|
|

|
|
The Kormoran in 1940 (Photo: Bundesarchiv)
|
|
|
By this point, the Sydney had approached the Kormoran to 4,300 ft / 1,500 meters, an extremely close range for a potentially violent situation. We don't quite know why Burnett made this choice. Some historians suggested that he was simply incautious and made a mistake. Others propose that Burnett was acting under conflicting orders. On one hand, raiders were supposed to be destroyed, preferably from a long range where their motley armament posed no threat. On the other hand, enemy supply ships were to be captured and pressed into service to replace sunk Allied freighters. It's possible that Burnett approached so close to check the Kormoran's identity by looking at its physical appearance and to get ready for a potential boarding action.
|
|

|
|
Joseph Burnett, captain of the HMAS Sydney (Photo: Wikipedia)
|
|
|
Whatever his motivations might have been, Burnett had one more way to confirm the suspicious ship's identity. The Sydney sent the code "IK". This confused the Kormoran's crew. The code IK stood for "You should prepare for a cyclone, hurricane, or typhoon", which made absolutely no sense there and then. What they didn't realize was that it was a secret code. "PKQI", which the Kormoran already hoisted, was only the Straat Malakka's public call-sign; but the real Dutch ship also had a second, secret call-sign, "IIKP". The Sydney's message "IK" was not, in fact, a weather warning, but the two inner letters of the code. The proper reply, which the real Straat Malakka's crew would have known, was the two outer letters: "IP". Detmers, however, didn't know this, and failed to reply.
|
|

|
|
Two of the Sydney's rapid-firing 4-inch guns (Photo: State Library of Victoria)
|
|
|
The Sydney shut down its seaplane at 5:25 p.m., as the two ships were too close for a safe launch. Five minutes later, after waiting for the "Straat Malakka's" secret code confirmation, the Sydney sent one final light signal: "Show your secret sign."
Captain Detmers knew the game was up. He knew he was far outclassed by the Australian cruiser, but he also knew that the two ships' extreme close range gave him a chance. His older, weaker guns could not have reliably hit and damaged the Sydney from farther away, but he still had a chance to put up a fight at such close quarters. He had the Dutch flag dropped and the Kriegsmarine flag raised in its place to avoid committing a war crime by attacking under a false flag. The Kormoran opened fire as soon as the flag was up.
|
|

|
|
The Sydney with her Walrus seaplane in 1939 (Photo: BirtWistleWiki.com)
|
|
|
The ships opened fire almost simultaneously. The Sydney's first salvo largely flew over the Kormoran, except for a few that punched through the ship's funnel and bridge without exploding. The first shots of the Kormoran failed to hit anything important, but Detmers also had some of his torpedoes launched and raked the Sydney's side with the anti-aircraft guns.
And then everything started going amazingly well for the Kormoran. The second salvo of her outdated guns destroyed the Sydney's bridge and damaged the fire control tower and the wireless offices. Subsequent salvoes put two of the cruiser's four turrets out of action before they could fire a second time, one shell destroyed the seaplane, and shots started pounding the Sydney's hull at the waterline. A German torpedo hit the Sydney at the weakest point in its hull, near the asdic (early sonar) compartment, ripping a hole in the vessel. The Sydney turned sharply toward the Kormoran, either to ram it or to bring her own torpedoes to bear. After five minutes of furious firing, the Sydney's main armament was completely non-functional.
|
|

|
|
Group photo of the HMAS Sydney’s crew from July 1940 (Photo: Australian War Memorial)
|
|
|
Detmers decided to finish off the Australian ship and turned his own vessel so all four guns could be brought to bear simultaneously. This saved his life, as the Sydney had just launched her own torpedoes, which barely missed the maneuvering Kormoran. The raider's engines, however, were damaged by shots from the Australian ship, and failed at this moment. The German ship was dead in the water, the Australian one slowly limping away and apparently out of control; both were on fire.
|
|

|
|
One of the Kormoran's guns at its final resting place, inside the compartment that hid it from premature discovery (Photo: Western Australian Museum)
|
|
|
The Sydney sank some time during the night, after her bow tore off. None of her 645-man crew survived. The Kormoran was abandoned over the course of the afternoon after her fire control systems failed and an oil fire was spreading toward the magazine and the mine hold. 81 men of her complement of 399 died during the battle or the evacuation.
|
|

|
|
Some of the Kormoran's officers in a POW camp (Photo: Royal Australian Navy)
|
|
|
Nobody missed the Sydney for several days; it was normal for cruisers to be delayed, for example if they diverted to assist merchant traffic or if they had minor engine problems. It was only on November 23 that communications stations started broadcasting orders for the vessel to report in. Various ships started picking up German rafts and search planes spotted lifeboats over the next couple of days. Some lifeboats made landfall on the Australian coast and their passengers were rounded up by workers from a nearby sheep station (the Australian and New Zealand equivalent of a ranch). The Kormoran's crew was thoroughly interrogated by the authorities. They had orders to obfuscate their activities by answering all questions falsely, but the investigation eventually pieced together the events leading to the two ships' destruction.
|
|

|
|
Two lifeboats from the AHS Centaur towing one of the Kormoran's lifeboats (top right corner) (Photo: Australian War Memorial)
|
|
|
Multiple attempts to find the two wrecks were launched after the war, but they were only found in 2008. The Sydney's sinking marks both the greatest loss of life in the Royal Australian Navy, and the biggest loss of an Allied warship with all hands during World War II.
|
|

|
|
Some of the Kormoran's sailors after their rescue (Photo: Royal Australian Navy)
|
|
|
|
|